Recent Posts
Black Mold: Myths vs. Facts
7/17/2024 (Permalink)
As a trusted leader in the restoration industry, SERVPRO® is committed to not only providing top-notch services but also ensuring our clients are informed about common misconceptions surrounding issues like black mold. In this blog post, we aim to dispel some of the myths surrounding black mold and provide you with the facts you need to know to make informed decisions.
Myth #1: All Black Mold is Toxic
Fact: While black mold (Stachybotrys chartarum) is commonly associated with toxicity, not all black mold is problematic. The color of mold does not determine its toxicity. There are many types of black mold, and some may not produce toxins at all. It's essential to identify the type of mold present.
Myth #2: Bleach Kills Black Mold
Fact: While bleach can help remove surface mold temporarily, it does not penetrate porous surfaces where mold often thrives. Additionally, bleach can be harmful when used in enclosed spaces and may not effectively kill mold spores. Professional mold remediation services utilize specialized equipment and techniques to address mold at its source safely.
Myth #3: Mold Remediation is a DIY Job
Fact: Mold remediation requires specialized knowledge, equipment, and protective gear to ensure safety and effectiveness. Attempting to remove mold without proper training can lead to further contamination. Professional mold remediation companies, like SERVPRO, have the expertise to safely contain, remove, and prevent mold growth.
Myth #4: Mold Only Grows in Wet Areas
Fact: While moisture is a primary factor in mold growth, mold can thrive in various environments, including dry areas with high humidity levels. Poor ventilation, water leaks, and condensation can create ideal conditions for mold growth in homes and commercial buildings. Regular inspections and maintenance are crucial for preventing mold infestations.
Myth #5: Once Mold is Removed, It Won't Come Back
Fact: Mold spores are microscopic and ubiquitous, making complete eradication impossible. However, effective mold remediation involves identifying and addressing the underlying moisture issues to prevent mold from returning. Routine maintenance and prompt attention to water damage can help minimize the risk of mold recurrence.
At SERVPRO, we understand the importance of accurate information when dealing with mold issues. By debunking these common myths and providing factual insights, we aim to empower our clients to take proactive steps in addressing mold concerns effectively.
If you suspect mold growth in your property or have questions about mold remediation, don't hesitate to contact SERVPRO. Our certified technicians are ready to assist you with prompt and professional mold remediation services tailored to your specific needs.
Remember, when it comes to mold, knowledge is power. Stay informed, stay safe, and let SERVPRO be your trusted partner in mold remediation solutions.
Understanding Flood Damage vs. Water Damage: What You Need to Know
6/12/2024 (Permalink)
 If you're facing flood or water damage, trust the experts at SERVPRO of Highlands Ranch to provide prompt and professional restoration services!
When it comes to water-related disasters, understanding the difference between flood damage and water damage is important for effective mitigation and restoration efforts. While both may involve water intrusion, they differ in terms of their causes, insurance coverage, and remediation methods. In this blog, we'll explore the key differences between flood damage and water damage to help homeowners and business owners better navigate these challenging situations.
1. Causes of Damage
Flood Damage: Flood damage occurs when water floods a property due to external sources such as heavy rainfall, overflowing rivers or streams, storm surges, or flash flooding. It typically affects large areas and can result in extensive damage to structures, belongings, and personal property.
Water Damage: Water damage, on the other hand, can occur as a result of various internal factors within a property, such as burst pipes, plumbing leaks, appliance malfunctions, or roof leaks. Unlike flood damage, water damage is often localized and may affect specific areas or rooms within a building.
2. Insurance Coverage
Flood Damage: Flood damage is typically not covered by standard homeowners or commercial property insurance policies. Instead, it requires a separate flood insurance policy, which is offered through the National Flood Insurance Program (NFIP) or private insurers. Property owners in flood-prone areas need to obtain flood insurance to protect against financial losses resulting from flood damage.
Water Damage: Water damage caused by sudden and accidental events, such as burst pipes or appliance leaks, is generally covered by standard homeowners or commercial property insurance policies. However, coverage may vary depending on the specific policy terms, exclusions, and endorsements. Property owners should review their insurance policies carefully and consider purchasing additional coverage if needed.
3. Remediation Methods
Flood Damage: Mitigating and restoring flood damage requires specialized equipment, techniques, and expertise due to the nature of the water involved. Floodwater may contain contaminants, bacteria, and other hazards, requiring thorough cleaning, disinfection, and drying processes. Professional flood damage restoration companies, such as SERVPRO®, have the training and equipment necessary to safely and effectively remediate flood-damaged properties.
Water Damage: Remediation of water damage typically involves extracting standing water, drying affected areas, and repairing or replacing damaged materials and belongings. Restoration professionals use a combination of moisture detection tools, air movers, dehumidifiers, and other equipment to dry out the property and prevent mold growth and structural issues.
In conclusion, while flood damage and water damage may both involve unwanted water intrusion, they differ in terms of their causes, insurance coverage, and remediation methods. By understanding these key differences, property owners can better prepare for and respond to water-related disasters. If you're facing flood or water damage, trust the experts at SERVPRO of Highlands Ranch to provide prompt and professional restoration services tailored to your needs.
Navigating Colorado Storms: Understanding the Emergency Alert System (EAS)
5/15/2024 (Permalink)
Living in Colorado means being prepared for the unpredictable nature of mountain weather, including sudden storms and severe weather events. When these situations arise, staying informed and connected is essential for ensuring the safety of yourself and your loved ones. One critical tool in emergency communication during Colorado storms is the Emergency Alert System (EAS).
What is the Emergency Alert System (EAS)?
The Emergency Alert System (EAS) is a national public warning system that allows authorized government agencies to communicate important emergency information to the public through broadcast, cable, satellite, and wireless communications channels. Designed to provide timely and accurate alerts during emergencies, the EAS delivers critical information such as severe weather warnings, AMBER alerts, and presidential alerts to residents in affected areas.
How Does the EAS Work?
The EAS operates through a network of radio and television broadcasters, cable systems, satellite providers, and wireless carriers. When an emergency occurs, authorized government agencies, such as the National Weather Service (NWS) or local emergency management authorities, issue alerts using the Integrated Public Alert and Warning System (IPAWS). These alerts are then disseminated to EAS participants, who broadcast the information to the public.
Types of EAS Alerts
Weather Alerts: The NWS issues weather alerts for severe weather events, including tornadoes, flash floods, thunderstorms, and blizzards. These alerts provide essential information about the type, location, and severity of the weather threat, enabling residents to take appropriate precautions to stay safe.
AMBER Alerts: AMBER alerts are emergency notifications issued by law enforcement agencies to solicit the public's assistance in locating abducted children. These alerts include information about the child, the suspected abductor, and any relevant vehicles or locations, helping to mobilize the community in search and rescue efforts.
Presidential Alerts: Presidential alerts are rare messages issued by the President of the United States or their designated representative during national emergencies or significant crises. These alerts are intended to communicate critical information and instructions to the public, such as evacuation orders or national security threats.
How to Receive EAS Alerts:
To receive EAS alerts during Colorado storms and other emergencies, ensure that you have access to a variety of communication channels, including:
Television and Radio: Tune in to local broadcast stations for real-time updates and alerts from the EAS.
Wireless Emergency Alerts (WEA): Most smartphones are capable of receiving Wireless Emergency Alerts (WEA) directly from authorized government agencies. These alerts are delivered based on your device's location and can include severe weather warnings, AMBER alerts, and presidential alerts.
NOAA Weather Radio: Invest in a NOAA Weather Radio receiver with Specific Area Message Encoding (SAME) capabilities to receive weather alerts and warnings directly from the National Weather Service.
In conclusion, the Emergency Alert System (EAS) plays a crucial role in keeping Colorado residents informed and safe during storms and other emergencies. By understanding how the EAS works and how to receive alerts, you can stay prepared and proactive in responding to potential threats to your safety and well-being. Stay tuned, stay informed, and stay safe during Colorado storms with the EAS.
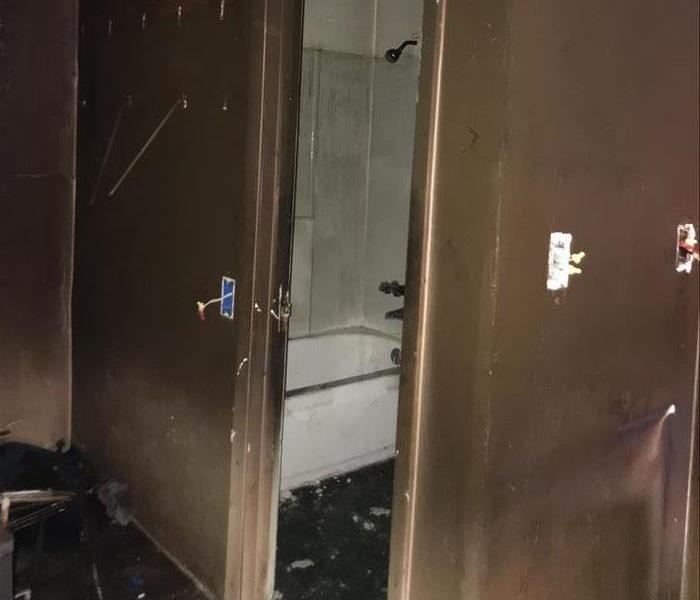
Safe Ash and Debris Cleanup After a Fire
4/8/2024 (Permalink)
 Remember, when in doubt, don't hesitate to seek professional assistance!
The aftermath of a fire can be overwhelming, but knowing how to safely clean up ash and debris from burned buildings is essential for a smooth recovery process. In this blog, we'll share practical tips to help you navigate the cleanup process safely and effectively, ensuring a thorough restoration of your property.
Safety First
Before diving into cleanup efforts, prioritize safety. Wear appropriate personal protective equipment, including gloves, masks, and sturdy footwear, to protect yourself from potential hazards such as sharp debris, toxic fumes, and airborne particles. Additionally, be mindful of structural instability and avoid entering heavily damaged areas until they have been deemed safe by professionals.
Assess the Damage
Begin by assessing the extent of the damage to your property. Take note of areas affected by fire, ash, and debris, as well as any potential hazards such as weakened structures or electrical hazards. This assessment will help you prioritize cleanup efforts and determine whether professional assistance is necessary for more extensive damage.
Remove Loose Debris
Start by removing loose debris from the affected areas. Use a broom, shovel, or vacuum with a HEPA filter to carefully sweep or collect ash and debris. Be cautious when handling debris to avoid stirring up dust or exposing yourself to harmful substances. Dispose of collected debris in designated waste containers or as directed by local regulations.
Clean Surfaces
After removing loose debris, focus on cleaning surfaces affected by ash and soot residues. Use a mild detergent or cleaning solution and water to gently scrub surfaces such as walls, floors, and countertops. Avoid using abrasive cleaners or excessive force, as this can cause further damage to sensitive materials. Rinse thoroughly with clean water and allow surfaces to dry completely.
Address Odors
Persistent smoke odors can linger long after the visible signs of fire damage have been removed. To combat odors, consider using odor-neutralizing products or natural remedies such as vinegar or baking soda. Ventilate the affected areas by opening windows and using fans to promote air circulation. In some cases, professional odor removal services may be necessary to effectively eliminate stubborn odors.
Consider Professional Assistance
In cases of extensive fire damage or lingering hazards, such as asbestos or chemical residues, it's best to seek professional assistance. Certified restoration companies like SERVPRO® have the expertise, equipment, and resources to safely and effectively handle cleanup and restoration, ensuring that your property is thoroughly restored to pre-fire condition.
Cleaning up ash and debris from burned buildings requires careful attention to safety and thoroughness. By following these tips and prioritizing safety, you can navigate the cleanup process with confidence and ensure a successful restoration of your property. Remember, when in doubt, don't hesitate to seek professional assistance to address any challenges or hazards associated with fire damage cleanup.
What is the Difference Between Mold and Mildew? 5 Things You Need to Know
3/13/2024 (Permalink)
 Distinguishing between mold and mildew is important.
Ever wondered what's really lurking in your home? Mold and mildew might be more common than you think. This blog aims to unravel the mystery between these two pesky issues. Whether you're a homeowner, renter, or just curious about your living space, we're here to simplify it for you.
1. Appearance: Visual Identification
Distinguishing mold from mildew often begins with their appearance. Mold typically presents as fuzzy or slimy patches with various colors, while mildew tends to have a powdery texture, usually in shades of white or gray. A good eye for these visual cues is crucial in identifying mold and mildew.
2. Surface Penetration: Understanding Depth
Mold tends to be more invasive, penetrating surfaces with its root-like structures, making removal a bit more challenging. Conversely, mildew remains more surface-level, simplifying the cleanup process. Recognizing this depth difference helps in choosing appropriate remediation methods.
3. Preferred Environments: Moisture's Influence
Both mold and mildew thrive in moist environments, but they have distinct preferences. Mold flourishes in damp, humid spaces and can colonize various surfaces, including wood and drywall. Mildew, on the other hand, often gravitates toward flat, damp surfaces like bathroom tiles or shower curtains.
4. Appearance Timeline: Swift vs. Gradual
Mildew tends to make a prompt appearance, often within 24 to 48 hours of moisture exposure. In contrast, mold takes a bit more time, typically becoming visible within a few days to a week. Understanding this timeline helps with timely intervention.
5. Remediation Approaches
Effectively addressing mold and mildew requires tailored remediation approaches. Mildew can often be managed with household cleaning products, while mold may necessitate more robust cleaning agents. Additionally, fixing the underlying moisture source is crucial for both prevention and effective remediation.
In conclusion, distinguishing between mold and mildew is important. By recognizing visual cues, understanding their preferred environments, and employing appropriate cleanup methods, you can navigate these issues professionally and maintain a healthy indoor environment. Armed with this knowledge, you're well-equipped to address and prevent mold and mildew concerns effectively.
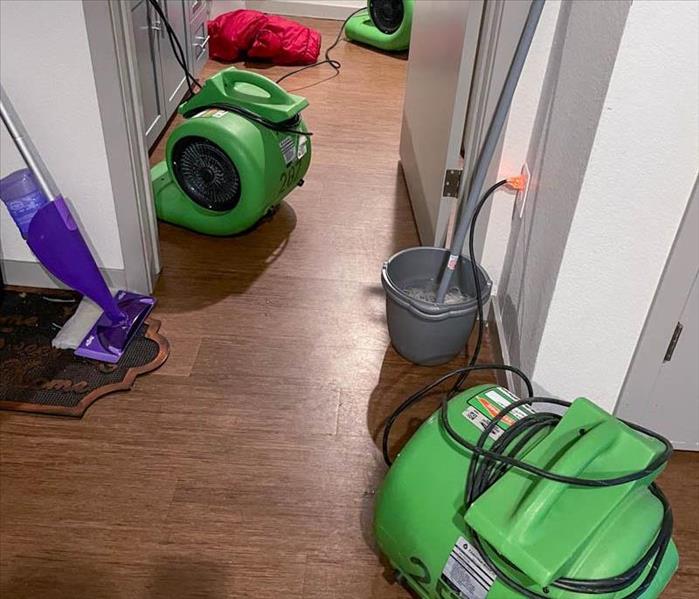
Drying Techniques: Air Movers, Dehumidifiers, and More for Effective Water Damage Restoration
1/17/2024 (Permalink)
When faced with water damage in your home, employing proper drying techniques is crucial to prevent further damage and mitigate the risk of mold growth. In this blog, we will discuss various drying techniques, including air movers, dehumidifiers, and other equipment used in water damage restoration, helping you understand their functions and the importance of professional drying methods.
Air Movers: The Power of Air Circulation
Air movers are essential tools in water damage restoration. They create high-velocity airflow, facilitating evaporation and efficiently drying affected areas. Learn about the different types of air movers, their placement strategies, and how they promote faster drying and prevent moisture buildup.
Dehumidifiers: Controlling Humidity and Preventing Mold
Dehumidifiers work hand in hand with air movers to control humidity levels during the drying process. Understanding the different types of dehumidifiers, their moisture removal capacities, and how they maintain optimal humidity levels is vital in preventing mold growth and ensuring thorough drying.
Moisture Meters: Measuring Hidden Moisture
Moisture meters are indispensable tools for detecting and measuring moisture levels in various materials. Professionals use these devices to identify hidden pockets of moisture that may not be visible to the naked eye, aiding in accurate drying assessments.
Thermal Imaging Cameras: Identifying Hidden Water Intrusion
Thermal imaging cameras help identify hidden water intrusion by detecting temperature variations. By capturing infrared images, these cameras can locate potential moisture sources behind walls, ceilings, and other surfaces, allowing for targeted drying efforts.
Injectidry Systems: Specialty Drying for Hard-to-Reach Areas
Injectidry systems are utilized to dry hard-to-reach areas, such as wall cavities, underflooring, and tight spaces. By forcing air into these spaces, moisture is extracted effectively, preventing potential damage and mold growth.
Desiccant Dehumidifiers: Efficient Drying in Challenging Conditions
Desiccant dehumidifiers excel in extreme temperature or low humidity conditions, making them ideal for challenging drying scenarios. Understanding how desiccant dehumidifiers work and their unique moisture removal process will enable more effective drying in adverse environments.
Heat Drying Techniques: Accelerating Evaporation
Applying controlled heat during the drying process can accelerate evaporation rates. Learn about heat drying techniques like direct-fired heaters, indirect-fired heaters, and heat mats, and how they aid in faster and more thorough drying.
Ventilation: Enhancing Airflow and Evaporation
Proper ventilation is crucial to removing excessive moisture and preventing stagnant air during the drying process. Discover the importance of opening windows, using exhaust fans, and employing other ventilation strategies to enhance airflow and expedite drying.
Employing the right drying techniques and equipment is paramount in water damage restoration. From air movers and dehumidifiers to moisture meters and thermal imaging cameras, understanding these techniques and tools will help you appreciate the importance of professional drying processes in efficiently restoring your home after water damage.
Fire Emergency Planning for Your Family: Building a Comprehensive Emergency Kit
1/3/2024 (Permalink)
In the face of a fire emergency, having a well-prepared emergency kit can be a lifeline for your family. A fire can escalate rapidly, leaving little time for decision-making. By proactively assembling a comprehensive emergency kit, you ensure that essential supplies are readily available, increasing your family's safety and resilience. In this blog, we'll guide you through the steps of creating a fire emergency kit.
Essential Documents
Start your emergency kit by including copies of important documents. These may include identification, insurance policies, medical records, and contact information for family members and emergency services. Place these documents in a waterproof, sealable bag to protect them from water damage.
First Aid Supplies & Emergency Contacts
A well-equipped first aid kit is a fundamental component of your emergency arsenal. Include bandages, antiseptic wipes, pain relievers, prescription medications, and any specific medical supplies your family members may require. Regularly check and replenish supplies to ensure their effectiveness.
Compile a list of emergency contacts, including local authorities, fire departments, medical professionals, and family members. Store this information both in your emergency kit and in a designated location in your home that is easily accessible to all family members.
Non-Perishable Food and Water, Flashlights and Batteries
Pack non-perishable food items that require little to no preparation, such as energy bars, canned goods, and dried fruits. Ensure you have enough food to sustain your family for at least three days. Additionally, include bottled water or a water purification system to cover your hydration needs.
In a fire emergency, power outages are likely. Equip your emergency kit with reliable flashlights and a sufficient supply of batteries. LED flashlights are energy-efficient and provide long-lasting illumination.
Protective Clothing & Face Mask
Include a change of clothes for each family member, including sturdy shoes, long-sleeved shirts, and pants. This is particularly important if you need to navigate through debris or unsafe areas during an evacuation. Smoke inhalation can pose a significant risk during a fire emergency. Include N95 masks or respirators in your kit to protect your family from inhaling harmful particles.
Cash and Personal Items
Keep a small amount of cash in your emergency kit, as ATMs and card transactions may be unavailable during a fire emergency. Include personal items such as hygiene products, prescription glasses, and comfort items for children. Ensure you have spare keys to your home, car, and any other essential locations stored in your emergency kit. This can expedite your evacuation process and access to necessary resources.
Document and include a family emergency plan outlining evacuation routes, meeting points, and communication strategies. Familiarize all family members with the plan through regular drills.
Creating a fire emergency kit is a proactive step towards protecting your family and ensuring their well-being during a crisis. Regularly review and update the contents of your kit to account for changing needs and circumstances. By being prepared and having essential supplies at the ready, you empower your family to face a fire emergency with resilience and readiness.
Unraveling the Truth: Debunking Common Misconceptions about Fire Damage Restoration
11/15/2023 (Permalink)
Experiencing a fire in your home or business can be a traumatic and stressful event. You may feel overwhelmed and unsure of the next steps to take. Unfortunately, there are many misconceptions about fire damage restoration that can add to the confusion and make the recovery process even more challenging. Here are some common misconceptions about fire damage restoration and the truth behind them:
All fire damage is visible
While it's true that some fire damage is visible, there are many hidden damages that may not be immediately apparent. For example, smoke and soot can penetrate deep into your walls, furniture, and fabrics, causing long-term damage if not properly cleaned. A reputable fire damage restoration company will conduct a thorough inspection to assess the full extent of the damage and develop a comprehensive restoration plan.
You can do the restoration yourself
Fire damage restoration is a complex and specialized process that should be left to the professionals. Attempting to clean up and restore your property yourself can be dangerous and may cause further damage. A professional restoration company has the necessary equipment, training, and experience to properly clean and restore your property.
Depending on the severity of the fire, many damaged items can be restored rather than replaced. For example, furniture, carpets, and clothes can often be cleaned and restored to their preloss condition. A restoration company can evaluate each item and determine whether restoration is possible or replacement is necessary.
While the restoration process can be time-consuming, a reputable restoration company will work efficiently to restore your property as quickly as possible. They will also keep you informed throughout the process and provide accurate estimates for how long each step will take.
Choosing the right restoration company
Not all restoration companies are created equal. It's important to do your research and choose a reputable company with experience in handling fire damage restoration. Look for a company that has the necessary certifications, insurance, and positive reviews from past customers.
Insurance will cover all the costs
While it's true that insurance can help cover the costs of fire damage restoration, it's important to understand that there may be limitations and deductibles involved. It's crucial to review your insurance policy and understand what is covered and what is not. Additionally, not all restoration companies may work directly with your insurance provider. It's recommended to choose a restoration company that has experience in working with insurance companies to help navigate the claims process and ensure that you receive the coverage you are entitled to.
Misconceptions about Restoration
One common misconception is that it's okay to wait before starting the fire damage restoration process. However, waiting can actually exacerbate the damage and make the restoration more challenging and costly. Smoke and soot can continue to cause deterioration and corrosion of materials over time. It's important to act quickly and hire a reputable restoration company to mitigate the damage and begin the restoration process promptly.
Another misconception is that fire damage restoration only involves cleaning up the visible damage. However, it goes beyond just surface cleaning. Restoration involves a comprehensive approach that includes odor removal, decontamination, structural repairs, and restoration of damaged items. A professional restoration company will have the expertise to address both the visible and hidden damages to ensure a thorough and complete restoration of your property.
By debunking these common misconceptions, homeowners can have a better understanding of the fire damage restoration process and make informed decisions in the event of a fire. Choosing a reputable restoration company and acting quickly can help minimize the damages and start the recovery process on the right foot.
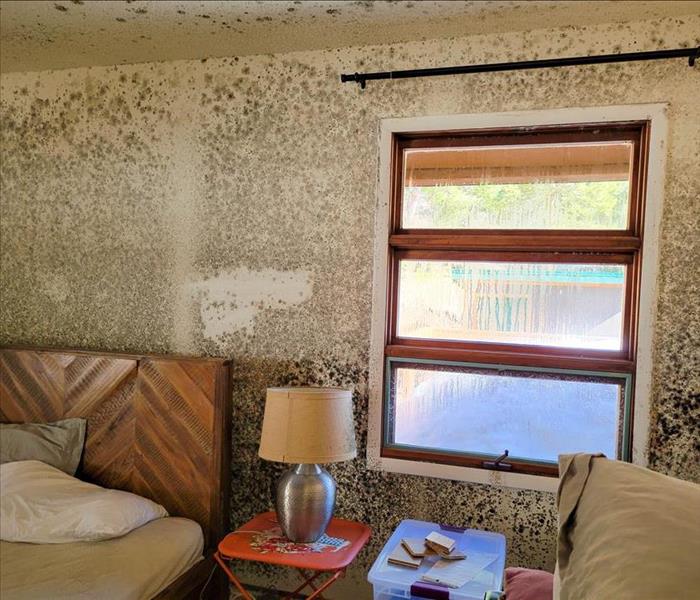
The Impact of Mold on Indoor Air Quality
10/24/2023 (Permalink)
Mold growth in indoor environments can have a significant impact on the quality of the air we breathe. While it is widely known that mold can pose a risk to the structural integrity of your home, it is also important to consider its effects on indoor air quality. In this blog, we will explore the impact of mold on indoor air quality.
Airborne Spores and Respiratory Irritation
Mold releases microscopic spores into the air, which can become airborne and have the potential to irritate the respiratory system. It is crucial to take proactive measures to prevent and eliminate mold growth to avoid the release of these airborne spores and maintain good indoor air quality.
Musty Odor and Unpleasant Environment
Mold growth often produces a distinct musty odor that can permeate the indoor environment. This odor can be unpleasant and make the space less welcoming. Additionally, the presence of mold can create a sense of discomfort and unease among occupants, impacting their overall experience in the affected area. Addressing mold growth is essential not only for maintaining fresh and pleasant indoor air but also for creating a more inviting and enjoyable living or working space.
Aesthetics and Structural Integrity
Mold growth on surfaces can be visually unappealing, affecting the aesthetics of a space. Stains, discoloration, and black specks on walls, ceilings, or floors can be signs of mold infestation. Beyond the cosmetic aspect, mold can also damage building materials and compromise the structural integrity of the space. Regular inspection and prompt removal of mold growth will help preserve the overall appearance and durability of surfaces, contributing to a healthier and more aesthetically pleasing indoor environment.
Long-Term Effects
Unaddressed mold growth can lead to long-term effects on indoor air quality. As mold colonies continue to grow and spread, the concentration of spores and mold-related particulates in the air increases. This can lead to a persistent decline in indoor air quality, affecting the comfort of occupants over time. Regularly monitoring for signs of mold growth and taking immediate action to address it will help mitigate any potential long-term effects on indoor air quality.
Maintenance Costs and Property Value
The presence of mold can have financial implications as well. If left unchecked, mold growth can cause significant damage to the property, leading to higher repair and maintenance costs. Mold remediation and restoration can be a costly endeavor, especially if the infestation has spread extensively. Moreover, mold-related issues can affect the resale value of the property, as potential buyers may be deterred by the perception of poor indoor air quality. By proactively addressing mold growth and maintaining good indoor air quality, homeowners can protect the value of their property and avoid costly repairs down the line. By understanding the impact of mold on indoor air quality and implementing preventive measures, such as moisture control and regular cleaning, we can create a clean and fresh indoor environment. Maintaining good indoor air quality is essential for our overall comfort.
How to Detect Signs of Water Damage in Your Home
10/16/2023 (Permalink)
 Being able to recognize the common signs of water damage in your home is crucial for addressing issues early and preventing serious damage.
Water damage in a home can be a costly and troublesome problem. It can lead to structural damage, mold growth, and even health issues if not addressed promptly. Recognizing the signs of water damage early on is crucial to prevent further damage and mitigate the risk of long-term issues. In this blog post, we will discuss common signs of water damage in your home that you should be aware of.
Water Stains
Water stains are one of the most visible signs of water damage. Look for discolored patches on ceilings, walls, and floors, especially in areas near plumbing fixtures or where water is commonly used. These stains can range in color from yellowish-brown to dark brown and may indicate a leak or water seepage behind the surface.
If you notice a persistent musty smell in certain areas of your home, it could be a sign of hidden water damage. Mold and mildew thrive in damp conditions, and their presence can result in unpleasant odors. Pay close attention to basements, crawl spaces, bathrooms, and areas near water sources, as they are more prone to moisture-related issues.
Mold and Mildew Growth
Visible mold and mildew growth are clear indicators of excess moisture or water damage. Check for signs of mold on walls, ceilings, and around windowsills. Mold can appear in various colors, such as black, green, or white, and may appear fuzzy or discolored. Act quickly to address these issues, as mold can cause health problems and further damage to your home.
Water damage can cause paint to peel, bubble, or crack due to the moisture affecting the adhesion between the paint and the surface. Large bubbles or areas of peeling paint are often signs of trapped moisture or leaks behind the walls. If left unaddressed, this can lead to further damage, including the potential for mold growth within the walls.
Warped or Buckled Flooring
Water damage can cause flooring materials such as wood, laminate, and vinyl to warp or buckle. Look for uneven or lifted flooring, floorboards that have changed shape, or gaps between the floorboards. These issues occur when excess moisture seeps into the subfloor or affects the integrity of the flooring material.
Prolonged exposure to water can cause drywall to deteriorate or become stained. Look for visible signs of sagging, bulging, or crumbling drywall. Wet drywall may also feel soft or spongy to the touch. Staining on drywall, such as yellow or brown marks, can indicate water damage or an ongoing leak. A sudden and unexplained increase in your water bills could be a sign of a hidden water leak. Monitor your water consumption and compare your bills over time. If you notice a significant and consistent increase, it may indicate a leak in your plumbing system or water fixtures.
Being able to recognize the common signs of water damage in your home is crucial for addressing issues early and preventing further damage. If you notice water stains, musty odors, mold, and mildew growth, peeling or bubbling paint, warped flooring, deteriorating drywall, or unexplained increases in water bills, it is important to take prompt action. By addressing water damage in a timely manner, you can protect your home, preserve its integrity, and avoid costly repairs down the line.

 24/7 Emergency Service